In today’s world, Cloud Computing is the clear way to go. It delivers the same on-demand computing services we all expect, but over the internet which provides the following benefits:
- Only pay for what you are using.
- Grow your infrastructure in minutes according to the load that your customers need.
- Create entire applications in the same way.
- All the changes you need to add can be deployed automatically by using Infrastructure as Code (IaC) + Serverless applications.
- Minimize cost overhead of management of servers and packages.
In addition, your developers will be able to focus on creating the functionalities that actually add a business value right away, instead of first preparing all the infrastructure they guess you’ll use, buy it, configure it and only after all this start to focus on what actually your business needs.
Let’s get technical. In this blog, we’ll walk you through how to set up your serverless architecture in this step-by-step guide.
How to get set up on the cloud?
- Design your solution based in a serverless approach.
- Define the language you’ll team will use to build it (Java, Go, PowerShell, Node.js, C#, Python, and Ruby).
- Select the tool you will use for your Infrastructure as a Code (IAC), like:
- Serverless Framework
- AWS CloudFormation
- AWS The Serverless Application Model (SAM)
- ZAPPA
- Claudia.js
- Terraform
- CDK
- CDK + SST
In this guide we will show you how you can build and deploy in minutes a simple API Rest application using API Gateway + Lambda (.nodejs) using AWS The Serverless Application Model (SAM).
Prerequisites
To use SAM, you will need to do the following before start developing:
- Install AWS CLI by following the next steps: Install
- Verify that you AWS CLI was successful, run the following command in the terminal: $ aws –version
- Install SAM CLI by following the next steps Install
- To verify that your installation was successful, run the following command in the terminal: $sam –version
How to start?
SAM is very useful for starting a project and offers a list of templates that we can use based on the type of architecture of your project.
To use this guide, you can use the following command in the terminal: $sam init
With this option, you can select an AWS template that has been created using AWS best practices or use a template that you have previously created (very useful when you already have your development team and want to create standards around your serverless applications).

At the time of writing this article, if you choose option 1 you can use any of these templates:

In this exercise, we will not use any of these templates but they are very useful when starting a project, and they also have examples of unit testing for Lambda functions which we liked a lot.
Something we need to be clear about with SAM is that when you use it you will have two key components:
- AWS SAM template specification: This is used to define all the infrastructure required in your project. See: Template structure details.
- AWS SAM command line interface (AWS SAM CLI), which we will use to deploy our applications. More info here: Command reference
Hands on
Now, let’s get into the matter of deploying a REST API with SAM. You can find an example of the code here:: https://github.com/hsaenzG/ApiWithSam which was made with SAM version 1.67.0 so you can play with it.
With this code you can deploy the API, test it, and delete it using the free data layer of AWS at no cost. Just don’t forget to delete it when you’re done using the command: $sam delete ApiWithSam
File structure
For this exercise, you will need the following file structure:

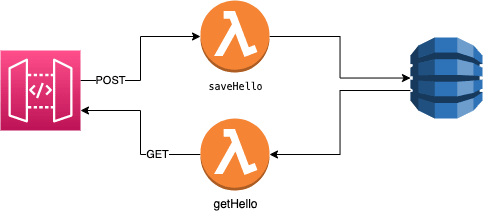
Architecture
In this exercise, we will create the following architecture:
Template
To do it with SAM, place the following code in the template.yml file:
AWSTemplateFormatVersion: '2010-09-09'
Transform: 'AWS::Serverless-2016-10-31'

Resources:
  SaveHelloFunction:
    Type: 'AWS::Serverless::Function'
    Properties:
      Handler: handler.saveHello
      Runtime: nodejs14.x
      CodeUri: ./greeting
      Policies:
        - DynamoDBCrudPolicy:
            TableName: !Ref GreetingsTable
      Environment:
        Variables:
          GREETINGS_TABLE: !Ref GreetingsTable
      Events:
        Api:
          Type: Api
          Properties:
            Path: /greeting
            Method: POST

  GetHelloFunction:
    Type: 'AWS::Serverless::Function'
    Properties:
      Handler: handler.getHello
      Runtime: nodejs14.x
      CodeUri: ./greeting
      Policies:
        - DynamoDBCrudPolicy:
            TableName: !Ref GreetingsTable
      Environment:
        Variables:
          GREETINGS_TABLE: !Ref GreetingsTable
      Events:
        HelloAPI:
          Type: Api
          Properties:
            Path: /greeting
            Method: GET

  GreetingsTable:
    Type: AWS::Serverless::SimpleTable

Outputs:
  MyApi:
    Description: "API Gateway endpoint URL"
    Value: !Sub "https://${ServerlessRestApi}.execute-api.${AWS::Region}.amazonaws.com/Prod/greeting/"
Here we are creating an API Gateway with two verbs: POST and GET.
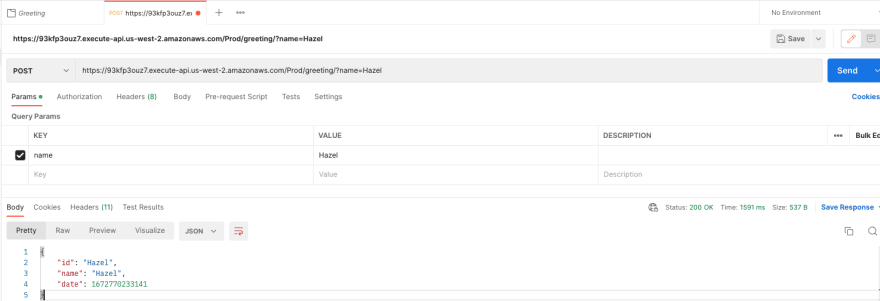
- POST: used to create a new resource. The request must include the resource data in the body in JSON format. Example: POST /greeting, with body { “name”: “John” }
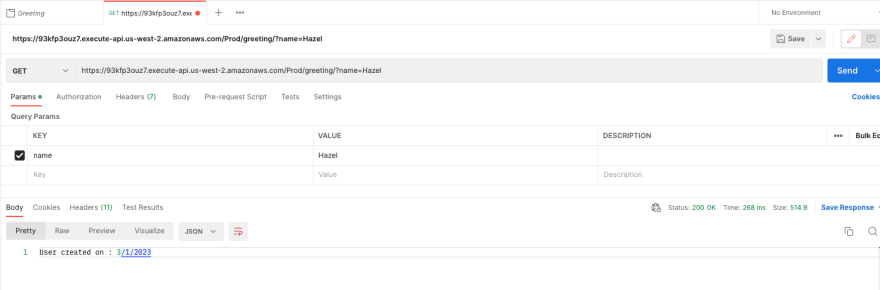
- GET: used to obtain information about an element. The request must include the resource ID, the name of the person entered for this example, in the URL. Example: GET /name/?name=John
Each of these has an associated Lambda function, and they write to and read from a table in DynamoDB. In addition, it creates a policy that allows creating, modifying, and deleting records in the DynamoDB table.
An IAM user was created on an AWS account with only the necessary permissions for creating Lambda, DynamoDB, API Gateway, and IAM (to create all the security policies required). It’s a good practice to assign only the minimal permissions to your IAM user that you will use in your IaC processes to avoid vulnerabilities in your account.
Lambda functions
In this exercise, both functions were created in the same handler.js file, but a good practice is to create a different file for each one.
const AWS = require('aws-sdk');
const dynamo = new AWS.DynamoDB.DocumentClient();
const TABLE_NAME = process.env.GREETINGS_TABLE || '';

exports.saveHello = async (event) => {
    console.log(event);

    const name = event.queryStringParameters.name;

    const item = {
        id: name,
        name: name,
        date: Date.now()
    }

    console.log(item);

    const savedItem = await saveItem(item);

    return {
        statusCode: 200,
        body: JSON.stringify(savedItem),
      }
}

exports.getHello = async (event) => {
    const name = event.queryStringParameters.name;

    try {
        const item = await getItem(name);
        console.log(item);

        if (item.date) {
            const d = new Date(item.date);

            return {
                statusCode: 200,
                body: `User created on :  ${d.getDate()}/${d.getMonth()+1}/${d.getFullYear()}`
            }
        }
    } catch (e) {
        return {
            statusCode: 200,
            body: 'There is no one with that name.'
        }
    }
}

async function saveItem(item) {
    const params = {
		TableName: TABLE_NAME,
		Item: item
	};

    console.log(params)

    return dynamo.put(params).promise().then(() => {
        return item;
    });
};

async function getItem (name) {
    console.log('getItem');

    const params = {
      Key: {
        id: name,
      },
      TableName: TABLE_NAME
    };

    console.log(params);

    return dynamo.get(params).promise().then(result => {
        console.log(result);
        return result.Item;
    });
};
Deployment
Now, to deploy the greeting app at your AWS account, simply run the command:
$sam deploy.
Once the deployment is finished, you will be able to see the URL of your API in the terminal like this:

Testing
To test them, simply copy this URL and use any application to execute HTTP requests. Postman was used for these examples, but you can use whatever you prefer.
POST
GET
You now have a functional Serverless REST API on AWS.
Congratulations! And don’t forget to delete all of your infrastructure after you finish testing with:
$sam delete ApiWithSam.
About Cognits
Cognits is a design and development company that specializes in user centric digital products which improve your value chain. Our mission is to empower your company by using design and development best practices to improve your existing processes in an agile, efficient, and affordable way. We strive by making your company succeed in the digital world.
References: AWS Documentation, Getting Started with AWS, Deploy Serverless API with SAM